Pages

Sunday, 20 January 2013

Woof! Woof! Woof!


Hey guys, a quickie, but a cutie today! I have Rheumatoid Arthritis, not sure if I've ever told you, but I do. I've had it for 19 years, and this has to be the worst winter for it in a very long time. So, I spent most of the weekend miserable, hangin' in my jammies and surfing the net, looking at cards of course!! Lookie what I found!
I happened upon a site I've never seen before - shocker but true! I liked it so much, it got me up off the couch and into my craft room (www.skiptomylou.org). It has downloadable patterns and all kinds of goodies to look at, here is the address for this little goodie:
www.skiptomylou.org/2012/06/24/make-a-puppy-ears-card-craft-camp/. Great site. Downloaded the pdf pattern for the puppy, traced the pieces, cut them out and put it together, easy as 1-2-3! The only thing I changed/added, was the colour of the card stock, sponged the pieces in Stampin' Up! Chocolate Chip ink to add depth, and did a little 'scene' on the inside of the card. I can't stop playing with it!! Would make a cute little boy birthday card, or a cool card to send the dog lover in your life, enjoy :)

Pull the dog's tongue, and the ears fly up!


Friday, 18 January 2013

Happy Birthday - to EWE!!

I need a new camera! If you're reading this oh wonderful husband of mine - Mother's Day is just around the corner! Sorry for the blurry pics!
My Mom kept some of the more interesting greeting cards I received as a kid in a shoe box and came across it last week during her after Christmas house clean-up. I found a paper doll card I got from my Grandmother back in the 1960's, which spurred the idea for this card.
This card is basically a gate fold card with a hole cut in the back of it, and I decorated the back instead of the front. I decided to place the puppet sticks on top of the sheep instead of the bottom as it makes the characters easier to play with when the theatre is set up.
I placed a narrow strip of card stock inside the card at the bottom to create a 'trough' to hold the sheep in place when the card is closed. I made a figure '8' closure on the back of the card to secure it and it also helps hold the sheep in place. I have some friends coming over next week for a night of gabbing and card making (yeah!) and I think this will be one of the cards we make. They wanted to make two cards, a girl and boy birthday card and I think this fits the bill! Baaaa!


This picture shows the trough which holds the sheep in place.

Wednesday, 16 January 2013

A 'Beary' Special Doll House

I have the attention span of a gnat! I went downstairs to my craftroom with every intention of cleaning it up (it looks like a bomb went off in it!) and got side tracked when I found my set of Build-A-Bear dies from Stampin' Up!
This little doll house card is a gift by itself, but you could tuck a gift card into the bear's bed to make it an awesome gift. If I were a little girl, I would be tickled pink to receive this!
To make a doll house card you need to score a 12" x 12" piece of sturdy card stock horizontally and vertically at 6", then remove one of the four quadrents. Keep that piece to create the band on the card front to hold the little bear. If you don't have the bear die, you could always make a punch art little girl, or character. I might just try that! You can spend hours decorating this little house. I decided to add a couch made from the Top Note die by Stampin' Up!, it folds up when the card is closed. You could even put several of these cards together and create a multi-room little villa. I might try that too! I made the little dresser that the flat screen TV sits on from a sheet of real wood, and used lots of bits and pieces from my scrap card stock bin to decorate. So much for cleaning my craft room, it was a disaster before I started this card, now it's completely destroyed! Ugh!


Wednesday, 9 January 2013

Happy Bird-day, Tweet Heart!

Hi card makers! Here's a cutie for you - made it for my friend and fellow card making fanatic, Tracey. Tracey is 12 years old, soon to be 13, and is only the 'kid' in any of my adult card making classes. She is a very talented girl, and not only keeps up with the class, but is one of my star students!!
Tracey is a very shy, sweet girl and somehow reminds me of a little bird, so I made this bird card for her birthday, which is extra special this year as she becomes a teenager!
It is a card in a card, a very versitile design and can be changed up for any occassion. And I got to use my new Martha Stewart Rod Iron Fence punch - bonus!
 F.Y.I., whenever I attach ribbon to a card as a tab, I always back it with a punched shape of matching cardstock to add strength and cover the mechanics.


Monday, 7 January 2013

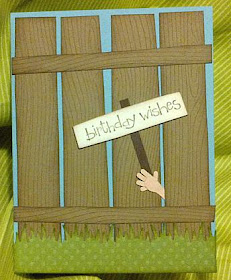
Happy Birthday Ben!

My nephew has a birthday coming up and I wanted to stay away from the traditional 'guy stuff' as far as design goes for his card. I don't know about you, but I do find it easier to make cards for girls. Boy cards tend to feature themes like sports, fishing, cars, you know 'guy stuff', whereas girls like everything else!
This card is one of those designs that with a few quick changes, like the sign on the front for example, could be made to suit any occassion.
The inside was a bit of a challenge, however. I ran into spacing problems attaching the boy's heads in the aperture. If they hang out too far, they stick out when the card is closed. I think my next attempt I will either make the hole bigger or move the outer fold lines in a bit to make more room.
I am going to play with this card design over the next few days to see what I come up with, I am still not happy with the inside of the card, it's missing something. Hate when that happens! I'll post my next few attempts for you as I make them. Might take me longer than few days, my craft room is a disaster, again! I think I need to have a yard sale, I am such a craft stuff hoarder!! Aren't we all??