Card Making, Basket Weaving, Paper Crafts, Jewelry Design and Fibre Art of Every Kind!
About Me
- Jennifer Wong
- My name's Jen. This is the place where I share my love of art with the world. Please stay a while, and leave a comment if you wish :)
Monday, 22 April 2013
Twin Sisters
I am going on a little trip to visit family and friends next week for a few days. Yeah!! One of the friends I will see has two very special 'tween' twin daughters. Those of you who know me know that I love to make toys and stuffies for kids, so I crocheted these twin sister monkeys to tuck into little bags of girlie junk for them. When crocheting stuffed characters I always use Bernat Satin yarn and a 'G' sized hook. I like the tight stitching this combo of yarn and hook provides, especially when using a single crochet stitch. Be generous with the poly stuffing as well. I use a chopstick to make sure the filling gets into all the nooks and crannies. Even though the girls are old enough that choking on small parts is not an issue, I always use safety eyes that have a locking mechanism on the back to prevent them from becoming a hazard. I also avoid beads or buttons unless they a firmly double stitched with extra heavy poly wrapped cotton thread. Hope they like them! I think they will, if there is one thing I do know, it's cool girl junk! Have a great day crafters!
Monday, 1 April 2013
Fare Thee Well Outlines :(
Outlines is, or was, an amazing little stamp company and it looks like they have closed their business, if I have read properly on their website. Their stamps are so unique, full of detail and for someone who loves to colour (like me!) they are perfect for card making. This stamp is one I purchased at Michaels not too long ago, it's number is PS0579. It's just the right size to fit an A2 card front, and as it is quite a 'busy' image I made it into a simple easel card.
I would love to own a delicious set of Copic markers, but sadly they are not in my budget, so I use Prismacolour pencil crayons and odourless solvent to achieve a similar effect at minimal cost. I was a bit unsure of what to do with the birdcage. I tried cutting it out, but the lines are just to detailed. I stamped it onto ivory paper using Versamark, then embossed it with Antique Gold powder by Tsukinek, by far my favourite brand. The powder is very fine and gives a smooth finish, and it comes in tons of different colours. I then used Distress ink in Vintage to add dimension making the cage appear to be rounded. And of course, every card is better with a bit of Stickles! Sorry to see you go Outlines, I will treasure my stamp collection that much more!
Saturday, 30 March 2013
My Dream House...
I am a huge Penny Black fan, and I love this stamp set. It's called "Victorian Houses" and the detail on them is amazing. The only problem I had was decided what colour went where! I stamped the house onto watercolour paper using Stazon in black. The house is coloured using Prismacolour pencil crayon and odourless solvent.
These stamps are quite large and won't fit on a standard A2 card, which measures 5 1/2" x 4 1/4", so I had to choose a larger mounting. It looked a little lonesome all by itself on a plain card front so I opted for a centre mount side-step card. I used my fav Distress Inks, Stormy Sky and Peeled paint, to create the lawn/sky background paper, then stamped a few whispy trees in brown Stazon. I found the cutest little mini flower punch ever at the Dollarstore of all places, and punched some mini purple flowers topped with Daffodil Dimensional Pearl. I found really good instructions for making a side-step card on splitcoaststampers.com in the tutorial section. Their instructions are always good, love the pictures and most include a video which really helps explain things. Happy Spring!
Friday, 29 March 2013
Thumbs Up!!
My daughter, who is graduating from Carleton University this spring, asked me to make a thank you card for one of her professors. I immediately decided on black, red and white, which are the school colors, then thought hard about the design. While experimenting, I got ink on my fingers and ruined a piece of white card stock in the process. It reminded me of some cards I made eons ago that were based on fingerprints. I used Spellbinder Nestabilities/Labels One and my trusty Bigshot to create a swing card. Darlene003, a card making youtuber (is that a word?) posted a great instructional tutorial video on making the swing card. Her card design features my fav punch, the Stampin' Up! Two Step Owl punch and is worth a peak! Congrats Emily, and thanks to your professor too!
Thursday, 28 March 2013
Happy Birthday Dear Kyle...
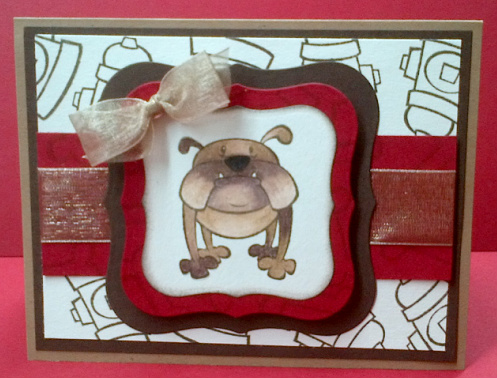
Just a quickie, a bulldog birthday card for my oldest daughter's boyfriend, Kyle. Emily and Kyle are planning to 'adopt' a bulldog puppy soon, so I thought a dog theme card would suit. The dog stamp is by Reflections and is one of the new stamp sets I purchased at Michael's recently. I couldn't find suitable background paper so I made my own by stamping fire hydrants from the same stamp set onto white card stock. The dog is colored using Prismacolor pencil crayon and odorless solvent blended with a cardboard blender. Happy Birthday Kyle!!
Hey Girl!
This little cutie is my youngest daughter Ellen, at age two. She has grown from an adorable little girl into an amazing young woman. She is graduating from college next month and has just bought her first car. It is hard for me to believe that she is 20 years old. Time passes so quickly. I CASE'd this little girl card from www.laurafadora.wordpress.com, after seeing her design on Pinterest. Her blog is loaded with lots of card making ideas and techniques, definitely worth a visit. Her `girl`card reminded me so much of my Ellen, that I made my own version. I used a Spellbinder circle die to create the head and hair and added two punched scallop circles for the pompom ponytails. I added some pink chalk to the cheeks and nose. Ellen had the most kissable cheeks ever!!
Friday, 15 March 2013
A Country Floral Cascade
Did you all see the new spring issue of Card Maker magazine?? It has a gorgeous floral cascade card on the cover. It inspired me to make this cascading card. Usually I make my cascade cards with three tiers using an 8 1/2" x 11" piece of card stock, but I followed their instructions and used a 12" x 12" piece of card stock to make this a four tier card. The instructions were very good, and I would recommend trying it out. To decorate this card I got to use my new Blossom punch and Mixed Bunch stamp set and Cherry Cobbler ink pad by Stampin' Up! (I bought myself a little treat, shh!) I added some greenery using a Martha Stewart leaves punch and a swirl/flourish die. I added a few squirts of homemade gold glimmer mist. I did use quite a few Distress inks as well, Vintage Photo, Denim Jeans, Broken China and Peeled Paint. Topped it off with some wooden buttons and a bow in my fav new color, champagne. Happy Spring everyone, even though it snowed again today!!
![]() |
| I can't believe it actually folded flat! Hahahaha!! |
Subscribe to:
Posts (Atom)