About Me

My photo
My name's Jen. This is the place where I share my love of art with the world. Please stay a while, and leave a comment if you wish :)

Friday, 22 February 2013

Operation Write Home

A few weeks ago I was contacted by the organizers of Operation Write Home, which is a nonprofit group of people who help the morale of members of the United States military while they are away from home. They send, literally millions, of handmade greeting cards to soldiers all over the world and are always looking for donations of cards as well as card design ideas. They emailed me to let me know that one of my card designs, "Happy Bird-day Tweetheart", was selected to be featured on their blog! I was delighted! They asked me if I would write a blog post to tell my readers about their website, blog and cause.
Not only is it a great cause, but their blog is an absolute dynamite (!!) resource for card making ideas! They have a great picture gallery and tons of fun stuff for card making fans to explore and try!
Here is the address, please check it out! www.operationwritehome.org and the blog you will find at the top of their Web Page is called "Stars and Stamps". Thanks everyone!


Monday, 18 February 2013

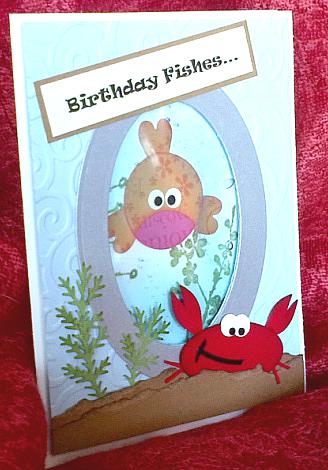
Birthday Fishes...


Here's an oldie but a goodie! I was checking out the tutorial section at www.splitcoaststampers.com and found this technique - using hair gel for a textured card front. Here is how you do it: squirt (cheap) hair gel into a small zip lock style baggie, about 1/4 to 1/3 full. squeeze out the air and seal bag. I always tape the top of the bag to be sure it won't leak. You can add glitter and a few drops of re-inker to add color if desired. Stamp image onto card front, I stamped some greenery, then adhere the bag to card using Red Sticky Strip or other strong adhesive. Cover with a die cut top to reveal the gel bag and decorate in any theme you wish. It kind of makes sense to decorate using a sea creature, ocean or fish tank theme, but you could make it into any card your imagination comes up with. I'm not too sure I would mail this card, maybe hand delivering would be best, just in case you end up with a 'squirt your friend and make a sticky mess card' rather than a birthday greeting!!

The little bubbles that are trapped add to the effect :)

Found the punch art fish on Pinterest - I am obsessed!!


Sunday, 17 February 2013

Tongue Tied


Just a quickie today! When ever I go to the drugstore, or any store that has a greeting card section, I always stop and take a look for inspiration. I found a cute little card with a frog on it and it was the inspiration for this card. I used a gate fold card base, and the turtle/frog stamp is one of the oldest in my collection, in fact it was the very first stamp I ever bought when I started card making as a hobby. I stamped the image with Versamark, then embossed it in black. I made a second copy so that I could cut the frog and turtle out to apply it to the first image. I coloured the image using water colour paints and highlighted the image with H2O Twinkle paints. I flocked the cattails with brown flock. * When flocking, always colour the area in a similar colour as your flocking if you are not using coloured cardstock, especially if the background is white. If you don't, the cardstock will show through the flocking and it will look sparse and spotty, and nobody wants spotty flock!


Tuesday, 5 February 2013

Pleasant Poppies - Again!

UUUGGGHH!!! I need to go to computer school! The whole reason I started blogging to begin with was to improve my computer skills, now I am just pulling my hair out! Okay, deep breath, there, I feel a little more in control of myself. I am posting this card again, as I accidentally deleted it last night. I deleted the pictures of the card too, so had to take new ones today, then when I tried to post them, they kept showing up out of order. After 4 tries, I gave up and the pictures are still out of order, ugh!!
Triple Stamping is my new 'fav' stamping technique. It is easy, dramatic and a good technique for all of your large stamps. For this card: cut 3 squares measuring 2", 3", 4" and stack them on top of each other and stamp all at once. There will be a small gap around each image, this is normal. Back each of the images with a co-ordinating card stock squares measuring 1/8" bigger than your stamped images. Adhere them together from larger to smaller, and colour using your favourite method. I used Distress Inks and a paintbrush. I pounce Distress inks of choice onto a plate of glass then use a damp paintbrush to pick up the colour. I stamped the image on a separate sheet of white card stock, coloured then cut out and adhered the heads of all the flowers separately. It added dimension and reduces the risk of a water drip ruining your card. There, my blood pressure is back to normal and I feel much better. Have a nice day everyone:)


Monday, 4 February 2013

Remember me...when this you see

A few birthdays ago, my Mom gave me the most thoughtful gift, one that I have kept and will treasure for a long time. It was a decorative box filled with folded slips of paper, and on each piece she had hand written a memory that we had shared together. Some were happy, some sad, I laughed at a few and we talked for hours after I opened all of them. Every once in a while I look at them and remember all that we have been through, and I am grateful that she is still with us.
Both of my daughters are graduating from school this spring, the younger one from college and the older one from university. I want to make them both a very special card to commemorate their time away at school and all that we have been through over the past four years!
I decided on a Box Card held together with a belly band. The card is flat when closed, then opens into a box to reveal several punched shapes, or 'tags', each with it's own hand written memory on it.
I experimented with the card construction and will post a tutorial on the Box Card in a day or two, once I get myself organized. I watched several different videos, and read different instructions on the construction of the card base, but opted to design my own which I am much happier with. I wrecked a couple of sheets of card stock, but I learned a lot and I will share to prevent you from wasting precious paper!
I opted for a vintage, 'grandma's old hat box feel' and used my new script background stamp on ivory card stock for the card flap and a floral background stamp for the liner. Both are stamped with Pumice Distress ink, and sponged with Vintage Photo Distress ink after distressing the edges with a distressing tool. That's a lot of distress!

The roses are made from a 1 3/4" circle, cut into a spiral then rolled using a quilling tool.