About Me

My photo
My name's Jen. This is the place where I share my love of art with the world. Please stay a while, and leave a comment if you wish :)

Sunday 18 March 2012

Udderly Amazing!

What a gorgeous day! The snow is melting away and I saw a Robin today! It inspired me to create this 'udderly' awesome card! This penny roller or slider card, both names are correct, and the pencil card below are the two cards I have planned for the upcoming Mother/Daughter Card Classes. They are a challange for sure, but we can do it! I have a nephew who likes to make cards with me and he would definitely be able to make these two cuties, maybe with just a little help. The two cards feature many different card making techniques and it will give the girls a chance to use lots of different tools, inks, adhesives, stamps and punches. We're even going to dig out the Cropodile and set a gromet! See you at card class, and Happy Spring!


Friday 9 March 2012

The RIT Dye Experiment

The computer and I just had a fight, it won. It loaded my pictures in the opposite order, despite repeated arguing. Hmmph!!
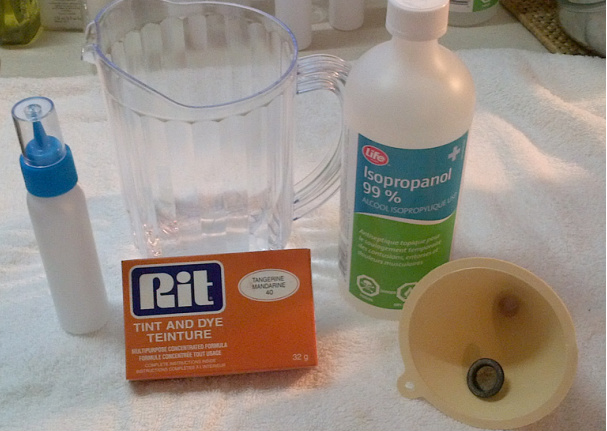
I did an alcohol ink experiment today, with some success, although I found it to be a little more work than using alcohol markers. A few strong words of caution: 1) RIT Dye stains, everything. 2) RIT Dye is very poisonous, do not allow any utensils used to ever contact food.
I mixed 2 ounces of 99% rubbing alcohol with 2 Tablespoons of dye powder, stirred and let it stand for 10 minutes. The dye will not completely dissolve and leaves a residue. I used a small screen (harvested from my mother's tea kettle, shh!) and put it in the base of the funnel before pouring the mixture into a mini squirt bottle. I am happy with the colour, but would add more dye and let it stand longer next time. I paid a whopping $0.99 for the box of dye and $4.00 for a huge bottle of rubbing alcohol, so this batch of ink cost about $0.60 to make. I didn't include the $0.99 I paid for the plastic jug at the Dollarstore. Bottom line, a little messy, but I would try this again and will post the results:)

Wednesday 7 March 2012

It's a Rainbow Day!

The sun is shining and it's a beautiful day! I was just reading the March/April issue of Papercrafts Magazine, and it's full of rainbows. I thought I would join them! The third picture I posted shows the new watercolour paints we are all going to get to play with some time in the very near future. When I pulled them out of the drawer I thought how pretty they are, so I took a picture and decided to share it!  I looked around my very messy craftroom, (I'm a messy crafter!) and found a couple of rainbow related items! The card is based on one that is featured in the magazine article, nothing to fancy but a quick card to make. I've never been so anxious for spring to come as I have been this year. It's been a long, dark and snowy winter and the sunlight is such a relief! Have a great day everyone, and we'll give the paints a test drive very shortly! :)

Tuesday 6 March 2012

Card Party Invitations

Good afternoon all! I've been asked by a card makin' pal to design a very special 75th birthday card for her father. They plan to hold a card playing, (not making!) party and asked for design suggestions for the invitations. I gave it some thought and this is the design I came up with. It's a clean simple design, and the best part of it, I think, is the removable playing card which has all of the party details on the back! It could also be kept of a memento of the day or they could even be numbered and used as tickets to draw for any door prizes! I didn't have any denim paper, so I created my own by applying Stormy Sky and Broken China Distress inks in a direct to paper technique.  The plaid design is a large background stamp by Hero Arts (#S5447 Large Plaid Pattern), stamped in Timber Brown Stazon ink, but any decorative paper that would be suitable for shirt fabric would do. I added some buttons and some faux stitching using a bronze colored gel pen. Hope you have a great party, I hear that you are planning to have 150 people attend, what a fun time that will be!!

Monday 5 March 2012

First Communion Card

This is a special card for a friend of a friend! Her little girl will be having her First Communion very soon, and I designed this card in her honour. It is a 'Z' fold card made by folding the front of the card back on itself - score first! The cardstock is from Stampin' Up!, Whisper White, Pink Pirouette and the layer right under the ribbon cross is vellum which was embossed with a dot folder, as were the white background pieces. I used Spellbinders Scallop and plain ovals to die cut the large medallion. To make the ribbon cross,  draw cross shape on the back of the white oval, not the vellum, and punch 1/4" holes at the tips with a hand held punch. Thread ribbon through the holes and attach to the back of the oval. Using matching thread tie a knot in the center of the cross to gather the ribbon, then adhere a punched gold heart. The sentiment is stamped in Chocolate Chip ink and is from SU! Le Garden Botinique, but you could always print a nice sentiment using the computer. I added Stickles to the ruffle around the oval, but paper piercing would be pretty too!!  I attached the mediallion to the card with Tombow, but you could use velcro dots, then the recipient would have a removable memento of the special day!

Sunday 4 March 2012

Easter Pop-Up Wiper Card

Do you ever have a card making idea that keeps you awake at night? Well, the idea for this card has been rolling around in my noggin for a while now and, I actually dreamed about last night. I took that as a sign that I had better make it, so I did! This type of mechanical card is called a 'wiper pop-up' card. When you pull the top to the right and the bottom to the left the little flag pops up.  I decided to put the bunny's carrots on the pop-up flag, but you could really put anything on it, as long as it fits, the space is a little tight. The card front featues a tree which is made from a sheet of real wood! It's a thin sheet of wood that you can cut with scissors, punch or die cut. I chose the cherry color, but it's available in other shades. The web address on the back of the package is http://www.creativeimaginations.us/. The inspiration for the punch art bunny came from one of my fave blogs, http://www.stampingaddicts.blogspot.com/, check it out, your bound to see something you like! I'm going to put a large die cut piece of white cardstock on the back for the writing surface, as this card doesn't open like a traditional card. I thought this would be a cute card to give my nephew, he's quite the little crafter and I know he'll enjoy playing with it!

Saturday 3 March 2012

Playing with my Border Punches

I have been playing with my border punches, and thought I'd share the results. I experimented with different widths of card stock and used the punch on both sides, instead of just one edge. I also tried off setting the pattern. This is something most of you have probably already discovered, but I had no idea border punches could be so versatile! I guess I don't need a new punch after all!

An Easter Card for Julie!!

Hey gang! I always ask what card projects you would like to make for future card making classes, and my friend Julie asked if I would design a few mechanical cards for Easter. The 'Exploding Floral Bouquet Card' is a project I've been itching to make, so I made this one this afternoon. The punch art Easter Bunny on the card front is cute, but the inside of the card is the best part! It opens to reveal an exploding hot pink bouquet of flowers! It doesn't get more 'mechanical' then that! I experimented with several different papers and cardstocks of various weights and colors before settling on hot pink gift wrap of all things! I chose this paper partly for the bright color and partly because of the weight as it adds very little bulk to the card considering the numbers of layers involved. It will definitely be a challange for card class, but we can do it! Hope you like it Julie! I'll post the second card as soon as I finish it. Happy Easter and Happy Spring to everyone!!